

Last summer I spent quite a bit of time building decks. One thing that I learned is that not all stairs created are equal. You can really add some style to your deck by building a beautiful set of stairs. When you are using composite decking materials, mitered stair ends really look nice. This is how you build composite decking stairs with mitered corners for a beautiful finished look!
New Update! Part 2…
This post has helped a lot of people, so I’ve decided to do a follow-on post for this topic to discuss another alternative method (more of an add-on to this method) to take your stairs up one more notch. I’ve also added an alternative method for the top attachment of the stringers and some information about how to use joist tape to increase the lifespan of your framing. Be sure to head over there after you finish this article.
Parts List
- 2×12 Pressure Treated Lumber for stringers and blocking
- Decking Material of your choice
- 3 1/2″ deck screws for securing 2×12 materials
- 2 1/2″ composite deck screws for decking attachment (matching color)
- Structural Screws for securing stringers to main deck frame
- 3/8″ x 3″ Galvanized Screws for leveling stringers
The Basic Process
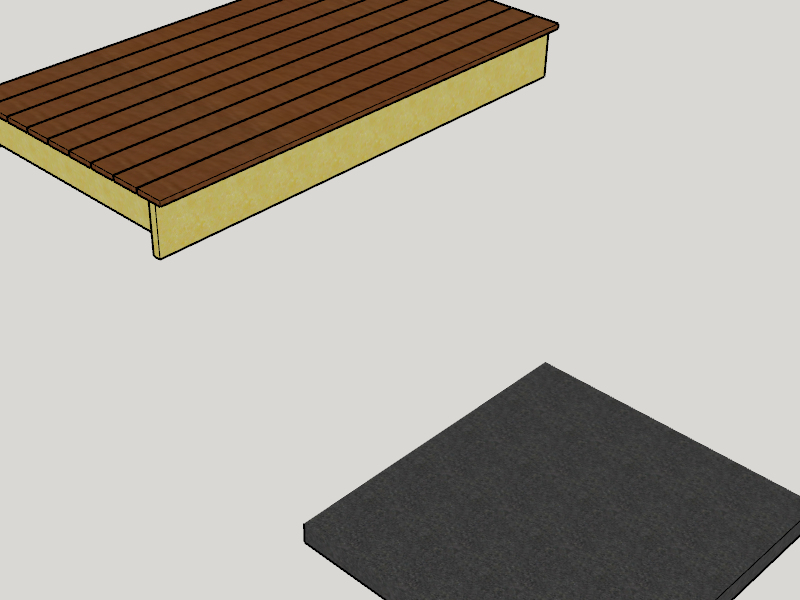
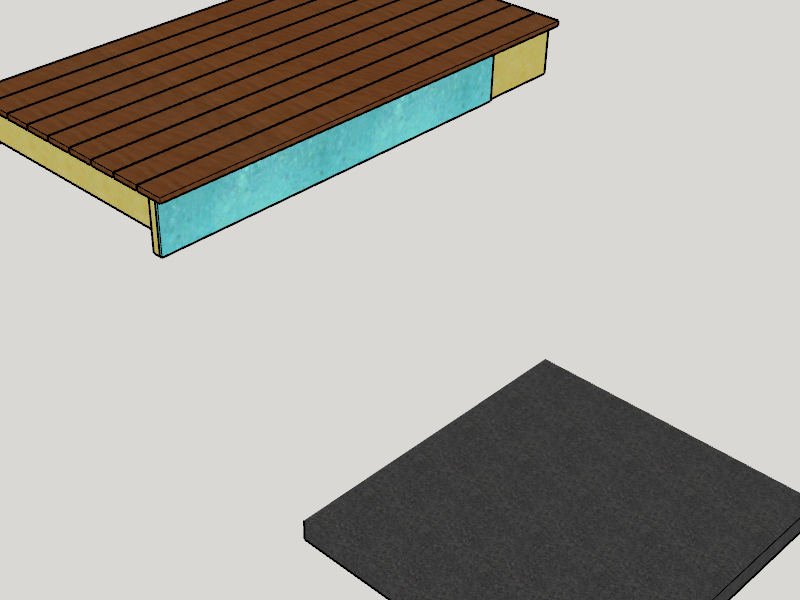
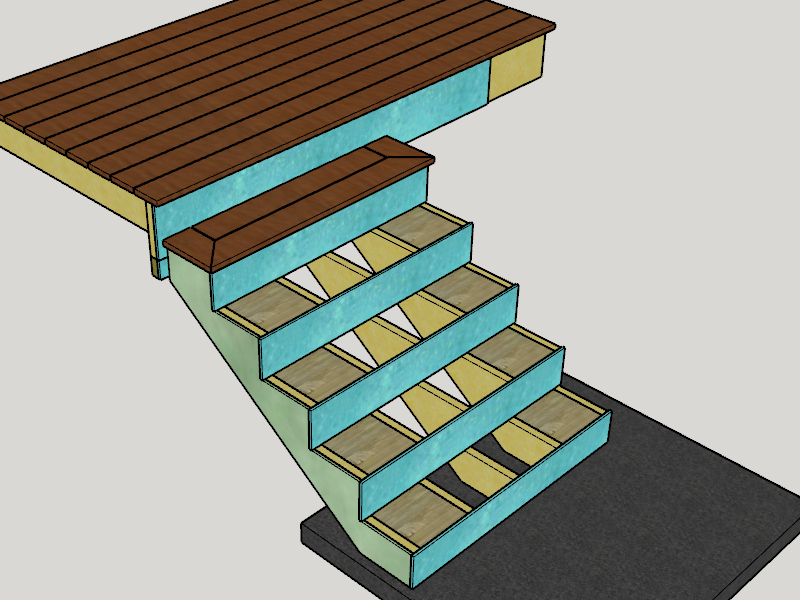
Before we dive into the details, let me show you the basic installation process. It’s very similar to installing basic stairs, with one important addition to the framing (blocking), and a few miter cuts on the deck boards. This basic method can be utilized with more complex stair designs (as shown in the cover photo) also. The key to this design is to install blocking when framing any of the mitered corners.
Here’s a photo montage of the installation process:
Measure and Cut Stringers
To many DIYers, this is the most challenging part of the project, but most people can do this with a few measurements, some basic math, and a square. You will need to figure out a few things to get the stringers designed:
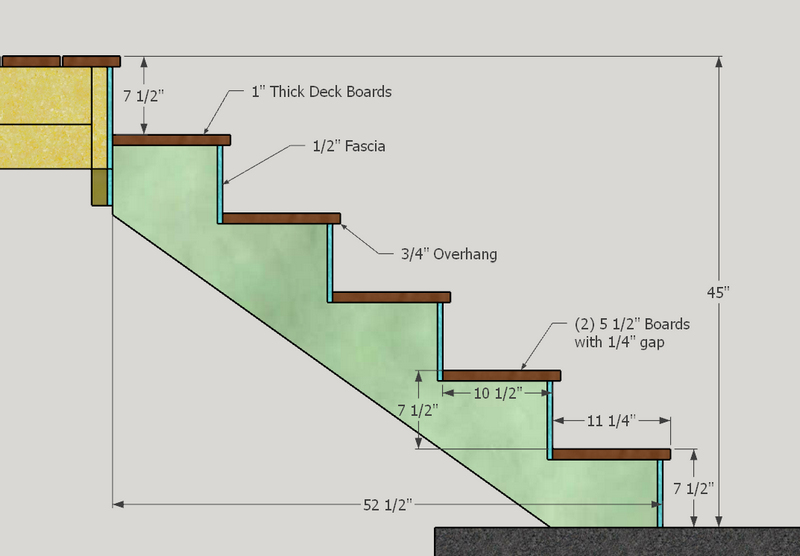
- Total rise of the stairs from the ground to the top of the deck (45″ as shown in the sample photo below)
- Make sure that you measure this height at the correct distance away from the deck if the ground is sloped.
- Tread Depth. I like to use (2) full deck boards (usually 5 1/2″ each) plus 1/4″ gap between them. This usually results in a 11 1/4″ tread, but make sure that you check these dimensions with your actual decking materials and spacing.
- Riser height. This is how high each step is. You want this to be the same for every stair and generally between 7″-8″. Just divide your Total rise by a number of stairs until your answer falls within this range. (45″ total rise ÷ 6 risers = 7 1/2″ riser for the sample stairs shown below)
- Tread overhang. I usually aim for 1/2″ – 3/4″. This looks good and is strong. You do need to check the profile on your specific decking though to make sure that the bottom front of your stair tread will be properly supported.
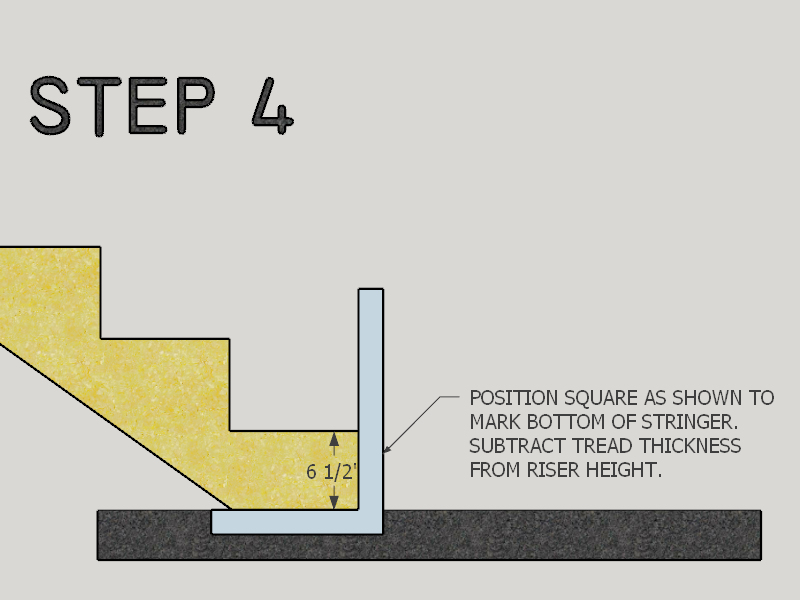
- Decking thickness. This will be subtracted from the first riser (bottom of stairs) when cutting the stringers. (1″ in the sample below, so the first stringer is cut at 7 1/2″ – 1″ = 6 1/2″)
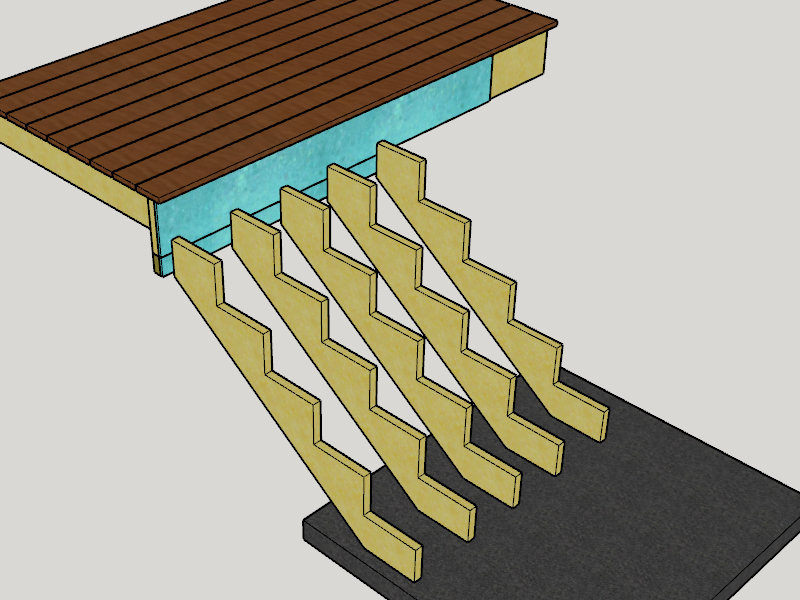
- Stair Width. This will determine how many stringers you will need. Generally, 12″ spacing is required between stringers (not 16″ like joists) because this is a high traffic area and the stringers are not as strong as the uncut joists. Refer to your specific local codes and decking material recommended installation practices though. (For this example stair set, the treads are 48″ wide, so 5 stringers are required, 1 on each end and 3 spaced 12″ apart in between those)
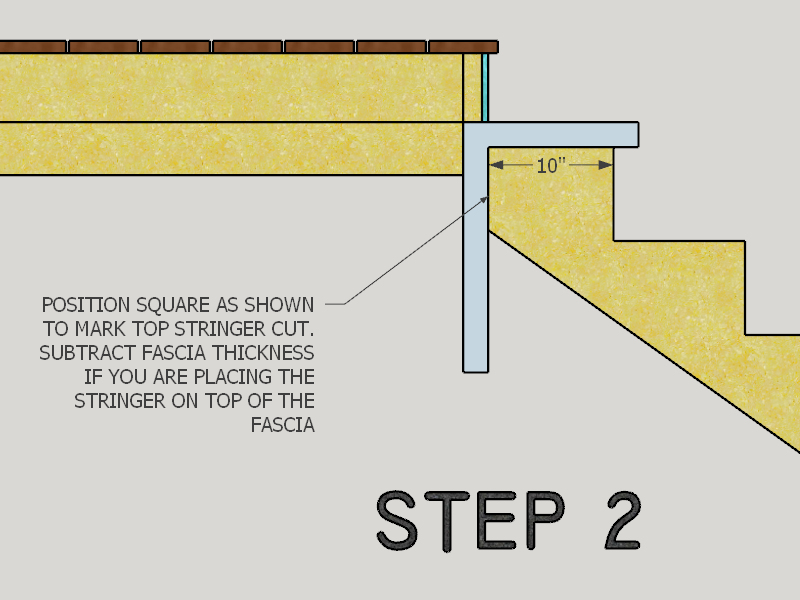
After determining these dimensions, there are two key dimensions that you will need to cut the stringers:
- Rise. The rise is equal to the Riser Height that was previously calculated. (7 1/2″ for this example)
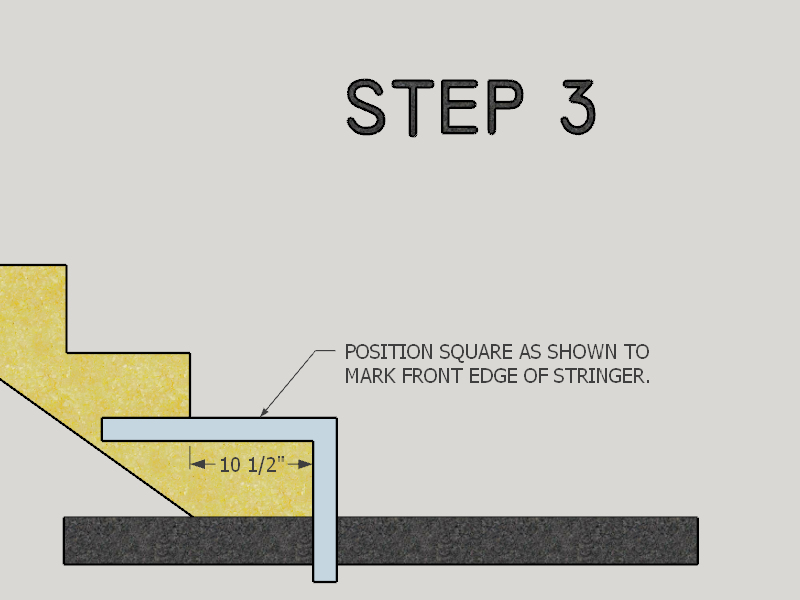
- Run. The run is determined by Run = Tread Depth – Overhang (11 1/4″ – 3/4″ = 10 1/2″ for this example)
These slides show how to measure and mark your 2×12 stringer material using a square:
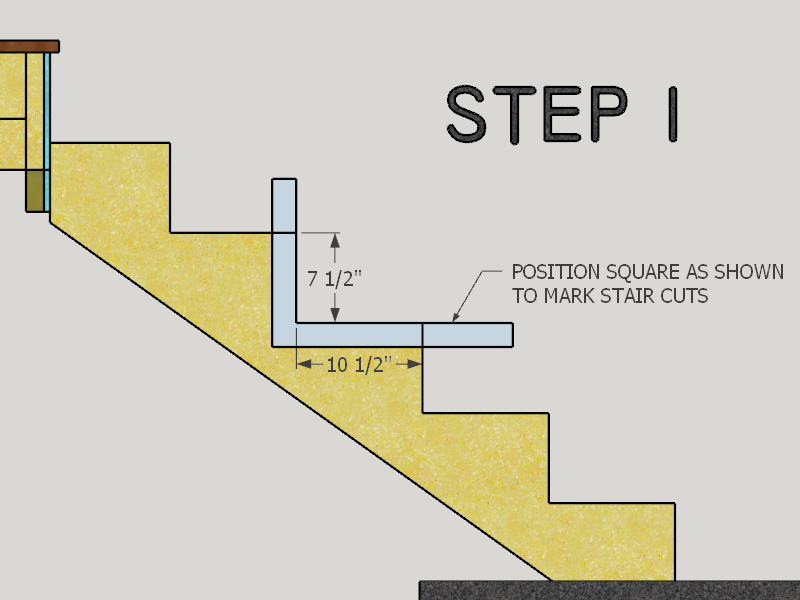
Cut one stringer and then use that as a template to mark the rest of them. It will save you a lot of time and ensure that they are all exactly the same. Make sure that you test fit that first stringer also!
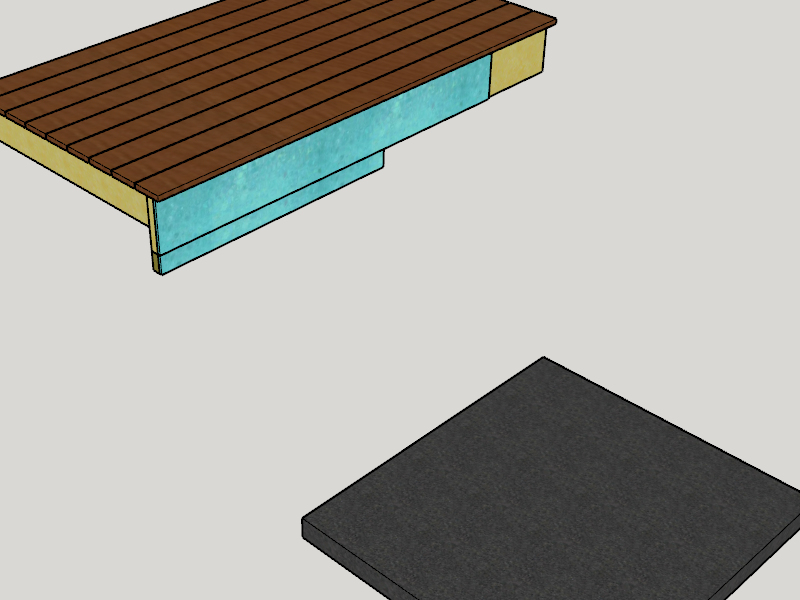
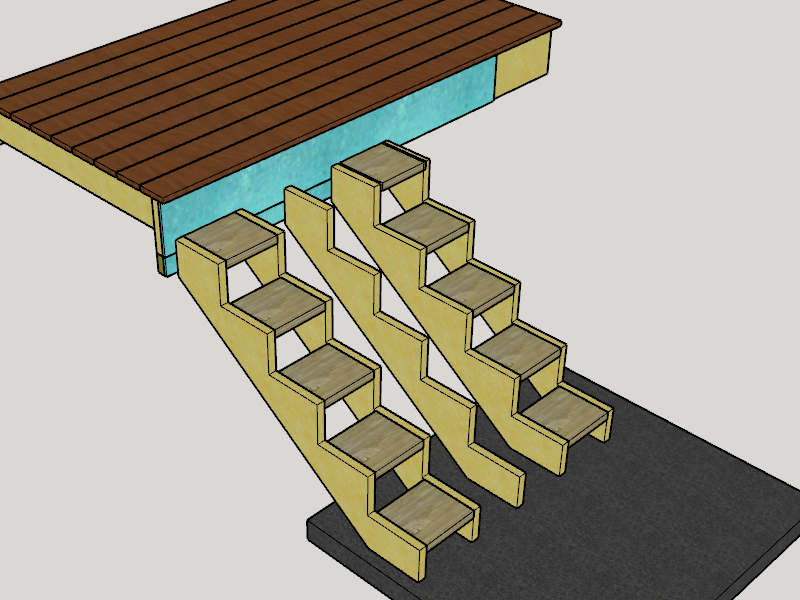
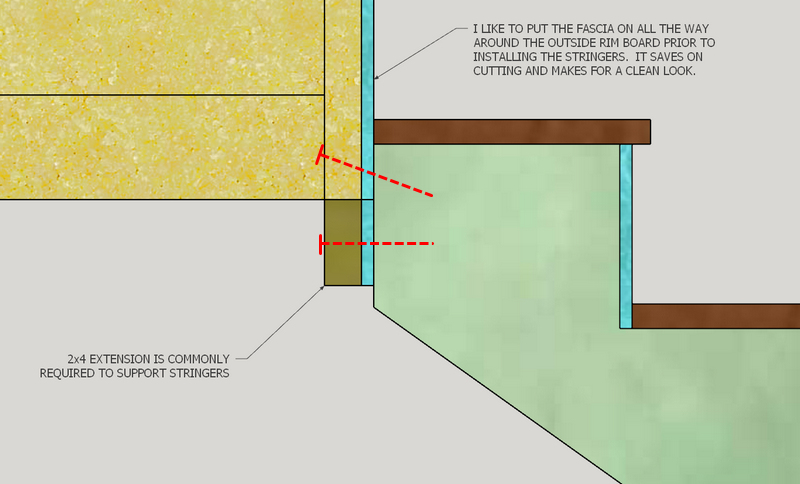
More than likely, you will also need to install a 2×4 (or 2×6) extension to the bottom of your main deck support where the stairs will attach. This will provide additional anchoring and support for the top of the stringers as shown in the photo below.
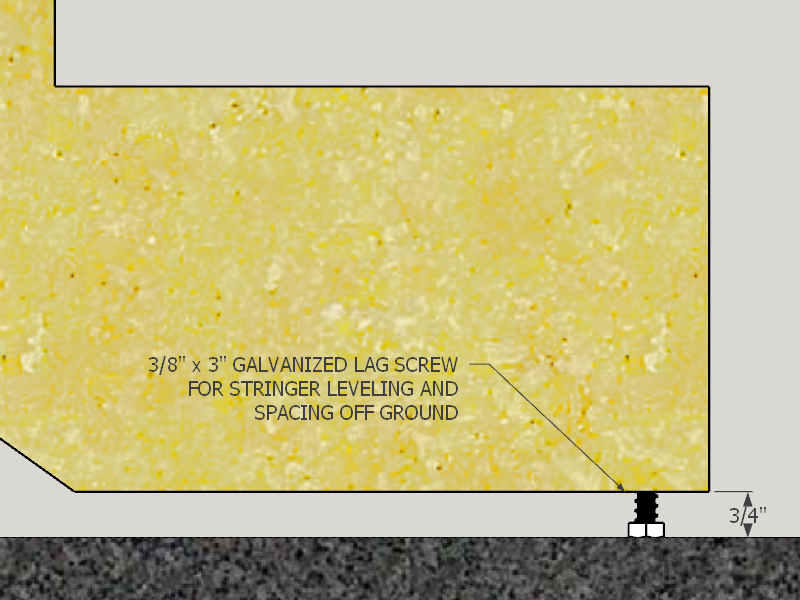
PRO TIP: Ground contact at the base of the stringers is not ideal and eventually will lead to rot. If you have a solid base platform (concrete or similar), it can be really helpful to space the bottom of the stringers off of the ground using lag screws. I use 3/8″ x 3″ galvanized lag screws. The bottom of the stringer will need to be cut 3/4″ shorter to leave space for the lag screw. The other advantage to this installation method is that you can fine tune the stringers to be level by adjusting these screws.
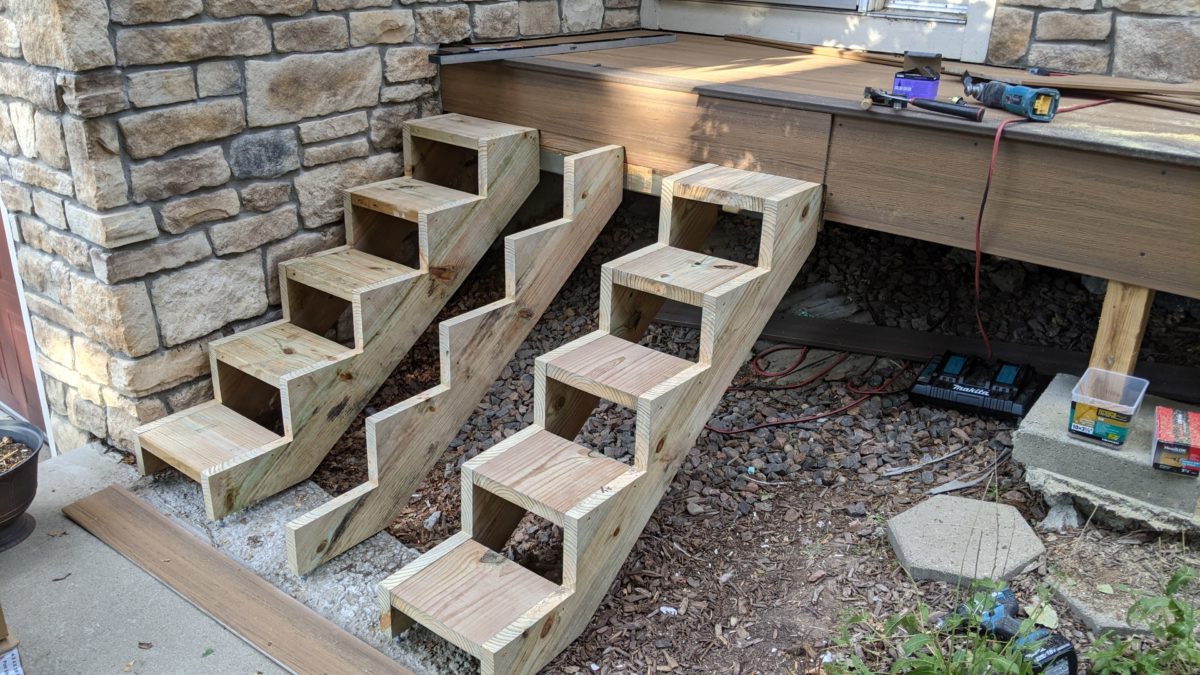
Install Additional Blocking
Now that you have the hard part done, it’s time to install the blocking that will support the mitered ends of the top deck boards. I usually just use extra 2×12 pressure treated material from the off-cuts of the stringers. Any pressure treated 2x material will work.
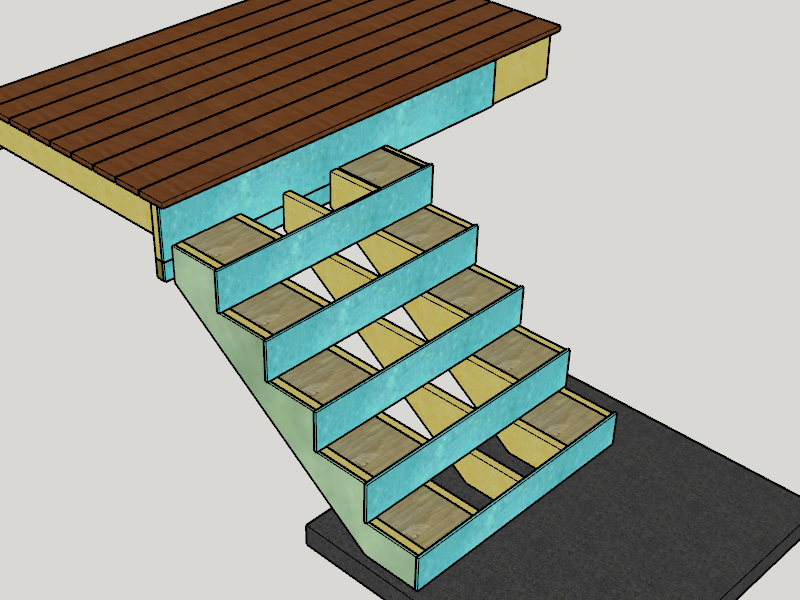
Measure the spaces between the outside two stringers on either end and cut boards to fit. Screw them in from either side of the stringers using 3 1/2″ deck screws. It should look something like this when you are done…
Install The Risers
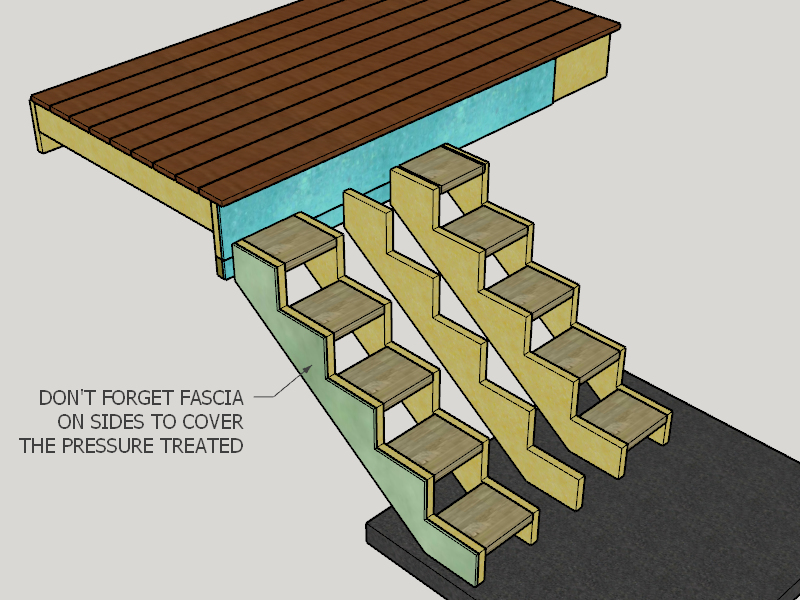
Next, you’ll want to install all of the risers and the outside fascia on the stairs (to cover the pressure treated wood).
The risers are pretty straightforward. Just make sure that you align the tops of the risers with the tops of the stringers. These boards will actually help support the front edge of the stairs quite a bit.
The stringer fascia is a bit more tricky to cut, since it is basically the same shape as the stringer itself. I’ve actually found that it is easier to take the stringer back off and use it as a template to cut the fascia.
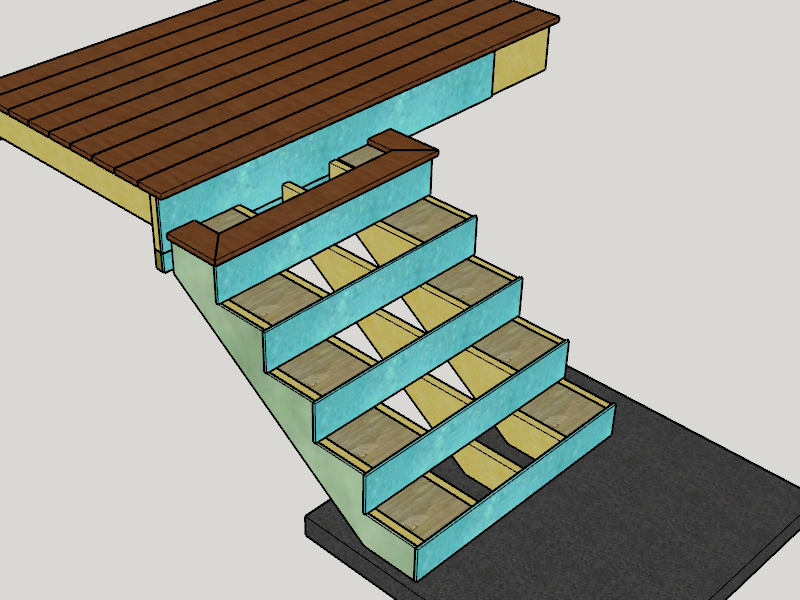
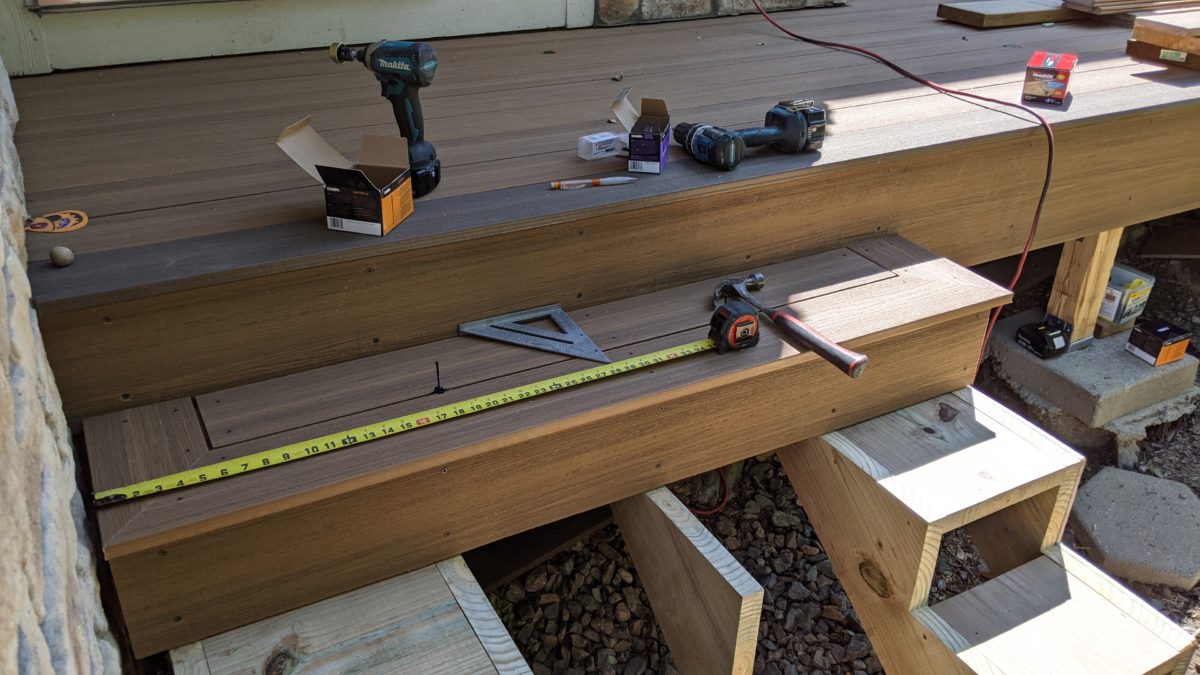
Install The Treads

Now we are in the home stretch. All of the prep work is done, and you are ready to install the treads. It’s pretty easy now. Just take your time, measure carefully, and make sure the miters meet up tightly to get that beautiful finished look
Make sure that you extend the treads past the outside edges of the stairs by the same amount as your toe overhang on the front of the stairs. It really looks nice like that. Leave a consistent 1/4″ gap (or whatever your gap is) to all sides of that inside board too.
PRO TIP: Take some extra time to make sure that all of the screws line up nicely. Don’t just quickly screw things together. These screws are very visible as you approach and walk up the stairs, so nice straight rows of screws will really make a difference here.
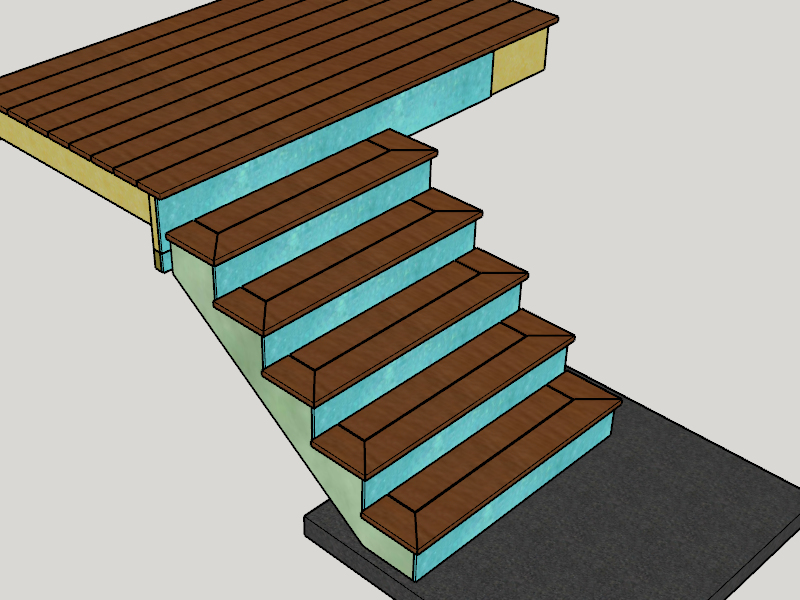
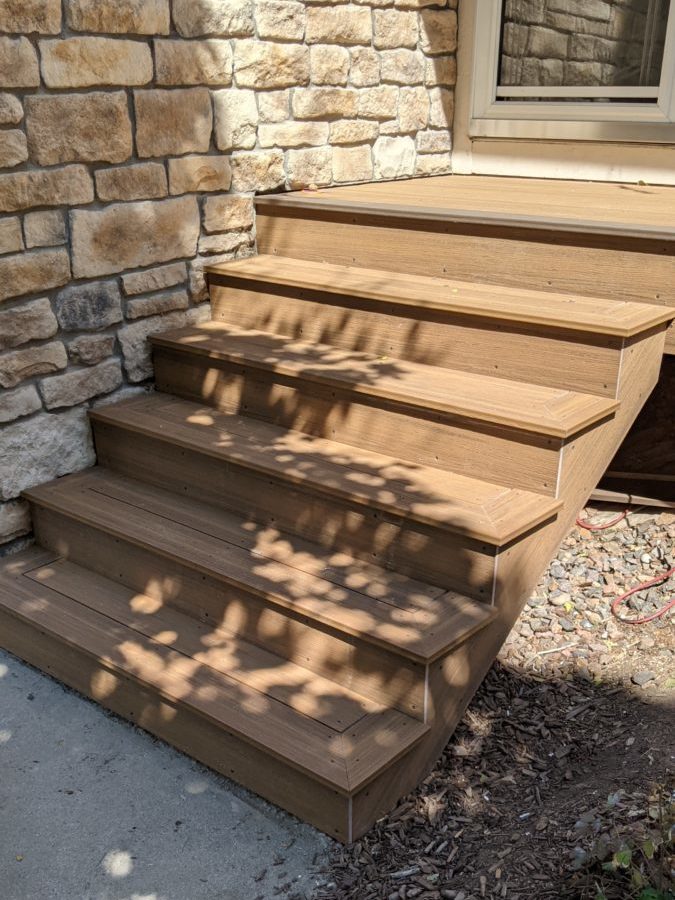
Step Back and Enjoy!
I think this stair installation looks fantastic when it’s completed. Don’t you agree?
Till next time…
Great explanation! One question- how do you prevent water from sitting in the groove of the horizontal deck boards?
You don’t. It really is not a problem with the 1/4″ spacing between deck boards. There is plenty of air movement to dry things out.
Good job man! I’ve just got one question…..what happens when your drill tips over, standing up on a finished surface like that?! I learned this the hard way 15yrs ago and still cannot anyone on-site to understand how stupid it is…your either gonna break a screw tip, your drill or the scratch the finish material!
-wisdom from a superintendent who actually wears bags and leads by example.
*The best is when new countertops are installed, subcontractors love to set their impact/drills/hole-saw/chew spitter/anything ready to jeopardize countertop and or new floor finish when it falls….key word, “when” 20yrs in the trade teaches ya a few “for sures”
🤦♂️
I agree, but it definitely makes for a better photo.
Hello – how do you install the additional blocking if you only have three stringers and therefore cannot screw into the second blocker after installing the first? Thanks!
George, You will need to toe-screw some of the blocking. It’s pretty common to have this issue on one side of the stairs that might be near a wall also.
You might want to look at the construction of your stairs. It is pretty uncommon these days to only have three stringers. That is not usually enough to support the load properly. If you are using any type of composite decking material, they usually recommend 12″ spacing between stringers.
How did you attach 2×4 to bottom of deck framing
I drilled holes from below and used long structural screws. I’d recommend just using structural stair stringer connectors like these now though. They are more generally accepted by inspectors as the “correct” solution. I’ve used them a few times now and they do work well. https://amzn.to/49GDpmu
Is the 2 x blocking with structural screws strong enough to allow for surface mounting of a handrail once the stairs are done?
Yes, I’ve found that it works well. Make sure that you predrill for the screws so you don’t crack the 2x material though.
Simpson and others make a hanger for stringers. I would not advise toenailing or back end nailing for stringer attachment. Under load, this connection could fail quite easily.
Thanks for your comment, John. I discuss that type of hanger in one of my other posts. That is certainly a good alternative and I’d probably recommend that for any new construction.
I’ve built a number of stairs this way though, and none of them have failed as far as I know. I don’t actually use nails for this application either. I use structural screws that extend well into the stair stringers.
Thanks for the visual…. I have a problem with replacing the stringers. If I stick with a 7.5″ rise, then I end up with a 4″ first step. Do you reocmmend just ripping the risers to correct height?
Yes, definitely rip the risers to the correct height. By code, the risers cannot differ by more than 3/8″. That first stair would definitely be a tripping hazard.
This is a nice and detailed guide for stair building. Love the composite decking material choice!
Thanks. I’m glad I was able to help you out!
Do you push the tread board flush with the backing facia board?
Also, I have also seen in a book the use of 2 X 4 cleat secured to the concrete landing pad, anchoring the bottom of the stringers. (a notch is cut out of the bottom the stringer. I live in a wintery location (Canada) and I am worried about rot attack to the wood but snow and especially ice is very tough on stairs. What do you think?
Sorry that I missed your comment earlier, Paul. These are very good questions though, so I’d like to follow up for everyone’s benefit.
I do push the tread board all the way back to the fascia board, but you could also choose to leave a small gap similar to what is typically between your boards. I always slope the treads just slightly towards the front to help with drainage too.
I would not anchor any lumber to the concrete, even if it is treated. Eventually, it will rot. That is why I choose to intentionally leave a gap with the leveling bolts as described in the article. It really doesn’t need to be anchored on the bottom anyways. The weight of the stairs and any force will be down on the slab.
I agree , FANTASTIC !
Thanks, David.